
My colleague Tom Grubb recently wrote a blog entitled “A better way to hold Marketo leads back from Salesforce”. Over the years, many clients have asked us for advice on the best method of syncing leads between Marketo and Salesforce, when the goal is to assign them to a salesperson only when they are qualified.
There are several methods of conditional syncing, some of which I outlined in an article from last year, but I think Tom hit the nail on the head when he advises not to hold back leads from syncing to Salesforce.com at all. Instead, he suggests that all are synced, but not assigned to a sales person until they are qualified.
This blog is a follow-up example of Tom’s method of re-assigning new leads from a queue to a salesperson after they qualify. While there are multiple methods that can accomplish a lead re-assignment, I chose this simple method because it a) can be triggered using logic of your choosing; and b) uses the standard Salesforce.com Assignment Rules.
Step 1: Gather the Information you need before starting
Get your queue ID. You can find it in Admin > Manage Users > Queues. Click on the name of the queue you are using and copy the ID from the browser address bar. Ours is “00GA0000000USx5”. Note that the browser address bar only contains the beginning of the queue ID, minus the 3-digit code. I want to point this out as it will come into play in a moment.

Step 2: Create a Re-Assignment Apex Class
Navigate to Admin > Develop > Apex Classes, click on the New button, and paste in the following code, and then click the Save button.
// Digital Pi - This Apex class is used to reassign a lead using standard assignment rulespublic with sharing class PBBRunAssignmentRules {@InvocableMethod(label='Re-run Assignment Rules on Lead')public static void ReRunAssignmentRules(list recordIds) {set LeadIds = new set();for (string recordId:recordIds){id rid=id.valueOf(recordId)Schema.SObjectType sot= rid.getSObjectType();if (sot == Lead.sObjectType){LeadIds.add(rid);}}if (!LeadIds.isempty()){//ID jobID = System.enqueueJob(new PBBLeadReassignQueueable(LeadIds));if (system.isFuture()) {system.debug('running in future already; exiting!');return;} else {system.debug('starting future call');futureLeadReassign(LeadIds);}}}@futurepublic static void futureLeadReassign(Set ReassignSet) {system.debug('in the future, doing lead reassignment');List UpdList = [SELECT Id FROM Lead WHERE Id IN: ReassignSet];for (Lead l:UpdList) {Database.DMLOptions dmo = new Database.DMLOptions();dmo.assignmentRuleHeader.useDefaultRule = true;// use leadAssignment rules when updatingl.setOptions(dmo);}system.debug(UpdList);update(UpdList);}}
Author: S. McLaughlin
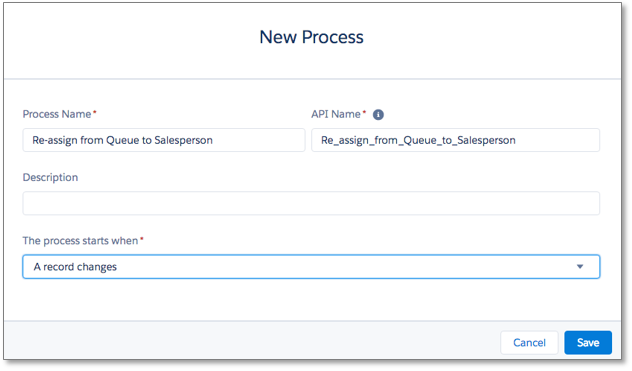
Step 3: Create a Business Process to run your Apex rule
Using a Business Process is easy to setup, and allows you to create multiple methods of running my assignment rules should you choose to do so.
Navigate to Admin > Create > Workflows & Approvals > Process Builder, and click on the New button.
Your new process looks like this before you configure it.
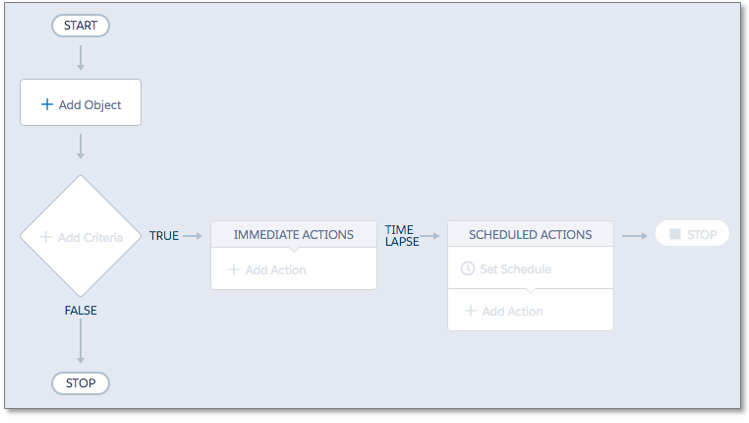
Click on the “Add Object” link and select the “Lead” object from the Object picklist. Select the “when a record is created or edited” choice under “Start the Process”. This is telling your process to execute whenever a record is new or an existing record is modified.

Click the Save button.
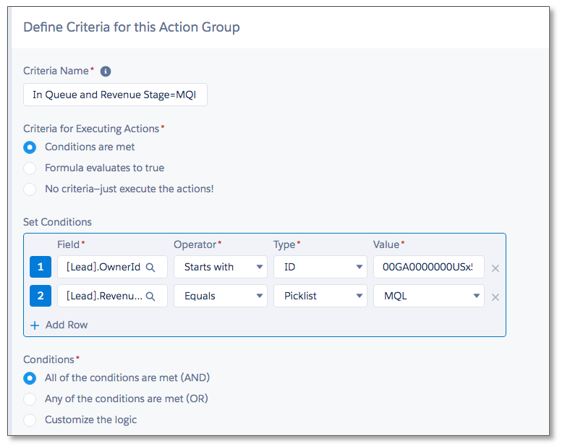
Next click the diamond shaped true/false step to enter in the criteria that executes the update. This is where you will need your Queue ID that we found in Step 1. Set the name of your step function. I chose “In Queue and Revenue Stage = MQL” as a descriptive way of describing the criteria that this step is looking for.
Now you can set the two filters:
- Lead.OwnerId STARTS WITH “00GA0000000USx5”. Remember, we use STARTS WITH instead of EQUALS because Saleforce appends IDs with a 3-digit code that is not shown in the browser address bar. Note: you can use DataLoader to get the full Queue ID if you prefer to use it, but this will work fine.
- Lead.Revenue_Stage EQUALS “MQL”
Choose the default values for “Conditions are met” and “All of the conditions are met (AND)”. Finally, click Save.
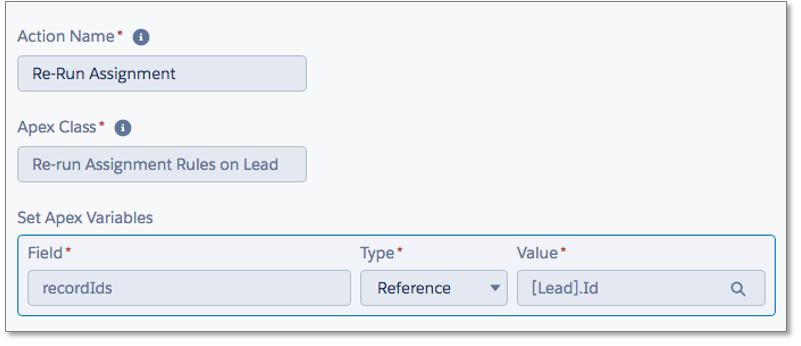
The next step will be the configuration of the “Immediate Actions” logic that calls the Apex code, which re-assigns the lead to a salesperson.
The last step is to press the Activate button, and then test the process. Remember, you can invoke you new “Re-run Assigment Rules on Lead” Apex Class in any number of scenarios by building new processes with process builder.