
Lets roll up the sleeves and get down and dirty on how to make that multi-channel approach a reality using Marketo and PFL. We share some concepts on how to enhance your Marketo nurturing streams to make the sending of direct mail as easy as sending an email. This is the blueprint approach PFL used in its own campaign to help drive $350K+ in incremental revenue.
Best of all, the process is evergreen, meaning set it up once and direct mail is sent automatically to the right person at the right time. You’ll definitely see a few Marketo twists that you haven’t seen before.
Prerequisites

- You have Marketo. PFL’s solutions also work with Eloqua and Salesforce, but we are covering Marketo here.
- Get your data clean. If you don’t have valid physical addresses or have a lot of 77 Mickey Mouse Way, you’ll need to strategize on your data plans. Or how about this: Use the gift as the incentive to obtain the physical address.
- You must be a PFL customer. This is not like buying a book from Amazon–there is some strategy and setup so give us a shout and we’d be happy to assist. As part of the strategy, you’ll need to pre-pick your direct mail piece or SWAG (Selfie stick, Coffee kit, Wine box).
- Set Up Your Webhook. PFL uses a webhook to get the information from Marketo to send the direct mail piece. The term “webhook” scares the average marketer but webhooks are a snap to use once they are set up. Don’t worry about the technical side as PFL will set this up as part of your engagement if you need help.
Step 1 – Create a New Marketo Program
To measure the success of this marketing spend vs other channels, you’ll first need to set up a specific channel with progressions. This process also allows you to manage all of the direct mail assets within the program. Here are a few sample ones to start with:
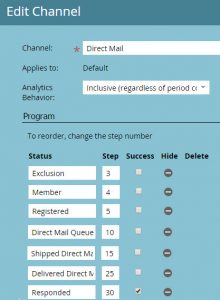 Member – Anyone who fills out a form requesting the direct mail piece. Or someone who is awaiting entrance into the direct mail program.
- Direct Mail Queued – Use this campaign to send the webhook to PFL. After sending the webhook, set the progression to indicate that the automated direct mail is queued at PFL. In our example, this is the campaign that the engagement program requests (Step 3).
- Sent Direct Mail – Adjust the progression to this status when PFL ships the direct mail.
- Received Direct Mail – Here the direct mail piece was received by the recipient, as indicated by the tracking information.
- Responded – Anyone who responds to the direct mail call-to-action by filling out the appropriate form. (Success)
- Lifecycle Success – Use this trigger campaign to flag if someone progresses in the funnel as a result of receiving the direct mail. (Success)
Step 2 – Figure out Who is Mailable and Who Isn’t
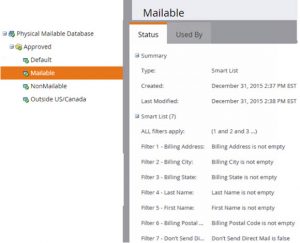 This process is something you probably haven’t done before because most companies are only sending email. However, this is a very similar process to how you create suppression lists for people with bad email addresses. With physical mail involved, you now need to consider how to get rid of people who have bad physical addresses.
This is a simple example of a segment that identifies obvious people that shouldn’t receive direct mail. We’ll use this segment in the next step. If you aren’t comfortable with segments, feel free to use a Smartlist.
Step 3 – Review Your Nurture Stream
Now go into your nurture engagement stream and figure out when the direct mail should become part of your prospect’s nurture journey. This example leverages programs within nurture engagement programs, as many organizations do and here, PFL chose to make the direct mail the fifth piece of content.
You can also send direct mail as part of standard Marketo flow steps if you aren’t using engagement streams.
The Special Twist
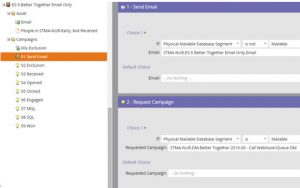 As first glance, the program looks like every email program within the Engagement stream. However, the big difference lies in the flow steps. This is where the magic lives. If someone is not mailable based on the segment in step 2, the person gets an email like every other program. If the person is mailable, now it’s time to kick off the direct mail program by requesting that campaign as you can see in flow step 2.
Step 4 – Develop the Direct Mail Program
There are different pieces to this direct mail program but it closely parallels other programs. It uses all the progressions outlined in step 1.
We won’t go into all the nitty gritty in this post but the big item here is the Queued campaign. This is the campaign that the campaign in step 3 requests to start everything. Instead of getting just an email during the nurture stream, this Queued campaign sends the email, waits a day and then sends the request (webhook) to PFL to initiate sending the package.
Other campaigns send alerts to Sales reps, tracking info to recipients and “Get your package?” emails.
The best part: It’s all automated as part of an evergreen nurture stream.
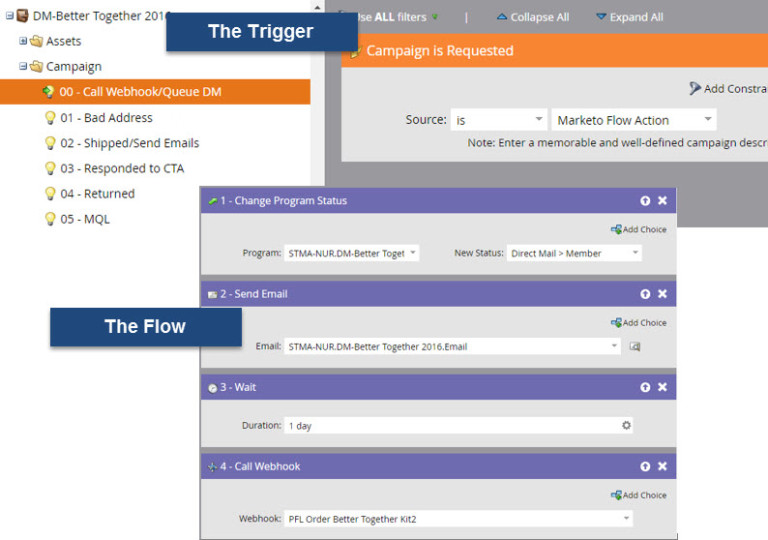
The Queued campaign is when Marketo sends the signal to PFL to ship the direct mail piece.
Summary – Get Started
Hopefully this post has opened your eyes on how to get started with automated direct mail. If you are interested in taking a deeper dive, we are here to help as a PFL partner. Contact us at hello@digitalpi.com for more information