
Most Marketo customers have only one Marketo instance, or perhaps two if they also get a sandbox for testing or development work. There are occasions, though, when we encounter multiple production Marketo instances, often in scenarios where companies were acquired or merged. And for some clients, it makes sense to continue using all of these instances in parallel with one another.
One of the foundational items to set up for a Marketo instance is its Munchkin web tracking script. Deploying this script on your web properties allows you to track page views and link clicks on said web properties.
With multiple Marketo instances, one might think that deploying Munchkin tracking is as simple as copying the Munchkin embed code from each Marketo instance and asking your web team to deploy all of them. While this would probably still get the job done, it adds unnecessary bloat to the process and is not very efficient. It will load the Munchkin library and API multiple times on each page view and generally slow things down. This means using more server resources, more bandwidth, a slower website—all of which add up to a less-than-optimal user experience.
In the default Munchkin embed code (found in Marketo under Admin > Munchkin), you will see a line that looks like this:
Munchkin.init(‘ABC-123-XYZ’);
This is the Marketo Munchkin JS API’s initialization function, init(). In the default embed code, one parameter, or argument, is passed into this function—your Marketo instance’s unique Munchkin ID. If there’s only one instance in the picture, then this is all you need.
However, when you’re running multiple Marketo instances side by side, it’s better to customize this Munchkin tracking initialization to fire visitWebPage and clickLink events in all Marketo instances. This can be done from a single line of code.
Rather than deploying the default Munchkin embed code from each instance separately, it is advisable to use the Munchkin API’s init() function’s altIds parameter, which allows additional Marketo Munchkin IDs to be added to the init() call. This initializes Munchkin tracking for each instance so that page views and link clicks will be sent to all Marketo instances identified therein.
The revised code should look something like this:
Munchkin.init(‘ABC-123-XYZ’, {altIds:[‘DEF-456-XYZ’,’GHI-789-XYZ’]});
The optional altIds parameter accepts a list (called an array, in programming parlance) of Munchkin IDs for other Marketo instances.
This approach works for two or more Marketo instances. Here is a live example from another client with two Marketo instances.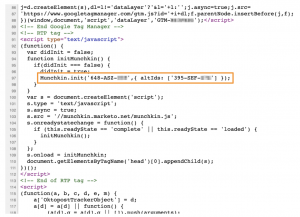
Both Marketo instance’s Munchkin IDs are present in the modified Munchkin tracking code on their live website. This sends Munchkin-tracked events to both Marketo instances, as you can see in the next screenshot.
The above image shows the result of including two Munchkin IDs in this snippet. Each action the user takes is logged to each of the two Marketo instances identified in the tracking code snippet—page view, then link click, then page view, then link click, then page view.
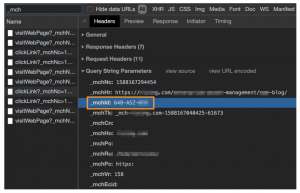
Clicking on any of these items in the Network tab reveals the Munchkin ID for each request.
Of course, once this has been deployed, test thoroughly to make sure that web traffic is being recorded in each Marketo instance listed.
- You can do this with a Web Page Activity report in the Analytics section of Marketo.
- If you have filled out a form or clicked on a tracked link in a Marketo email, you can also look at your own Marketo record to ensure that web interactions are correctly showing up in your Activity Log.
- The screenshot above also illustrates another way to verify that the tracking is working, and in real-time directly on the website.
- Load a page on the site that has the modified Munchkin script on it
- Right-click on the page and select Inspect; this should open the Web Developer toolbar, usually at the bottom of the browser window
- Click on the Network tab in the Web Developer toolbar
- Refresh the page; this shows all requests made on this particular page
- Enter “_mch” in the search box to filter these requests to only show Munchkin events
- To see the Munchkin ID associated with any of these requests, click on the request, then, on the Headers tab, scroll down to to the Query String Parameters section and look for the “_mchId” (a.k.a., Munchkin ID) parameter; it should be fairly recognizable to you at this point
- Note: these instructions and examples are for the Chrome browser; if you’re using a different browser, the steps may be slightly different
If you have any questions about Munchkin tracking for multiple Marketo instances or need help with anything related to your marketing automation platform, please reach out to us at hello@digitalpi.com. We’d be happy to help.