
Part 2: Using Bootstrap to create “Hide-Away” (Modal) Form Boxes
If you’re just tuning in, it’s not too late – we’ve only just begun. You can catch the full article here: https://digitalpi.com/2016/02/marketo-guided-landing-page-template-how-tos – or- just grab the code below and dive right in! In this tutorial, we’ll be leveraging Bootstrap.js to add a Modal Form & Trigger to a Marketo Guided Landing Page template we created in the last session.
You can check out a LIVE DEMO here: http://info.digitalpi.com/Demo-Template.html
[toggle_content title=”View Starter Template Source Code”][code language=”html”]
*Usage: In your Marketo Template Page, first erase all existing code. Copy and paste the code below into your page and click the Preview Draft button to view your template.*
========== [ Copy Code Below This Line until the End Break ] ==========

Headline Row: Left Column
Praesent porttitor malesuada ornare. Etiam pellentesque vitae risus in elementum. Vivamus ex sem, maximus in ligula vitae, dictum luctus felis. Etiam et rutrum mauris, congue hendrerit nisi. Aenean lorem sem, consequat sit amet diam ut, pellentesque aliquet ante. Ut egestas massa mi, nec condimentum ipsum suscipit non. Interdum et malesuada fames ac ante ipsum primis in faucibus.
Helpful Links – Marketo Docs
Editing Mode – under Landing Pages in Design Studio (Guided vs Free-form) sample templates: https://docs.marketo.com/display/DOCS/Guided+Landing+Page+Templates
For variables and code samples: https://docs.marketo.com/display/DOCS/Create+a+Guided+Landing+page+Template
Lorem ipsum dolor sit amet, consectetur adipiscing elit. Suspendisse turpis justo, venenatis non diam ut, lobortis bibendum dui. Donec a eleifend justo. Suspendisse egestas elit urna, quis cursus sapien molestie id. Quisque molestie quam vel ex porta, eget pulvinar turpis cursus. Sed faucibus odio at euismod tempor. Nunc lacinia at risus at hendrerit. Quisque hendrerit vel nisi eget auctor. Nam eu dolor porttitor, vulputate neque non, pretium ipsum. Phasellus sed odio suscipit, semper nulla vel, luctus tellus.
Nunc vehicula diam nulla, sit amet viverra orci aliquet sodales. Nunc condimentum ligula pellentesque nunc tempus, eget finibus lectus tempus. Vivamus vel odio at ligula porta lacinia eget dapibus nunc. Quisque nec feugiat nibh, at euismod turpis. Praesent finibus risus mi, ut consequat ligula lacinia quis. Aenean pulvinar purus et justo eleifend, at convallis nulla iaculis. Pellentesque dapibus justo nisi, non fermentum erat condimentum in.
Form Headline / Title:
========== [ Copy Code Above This Line until the Top Break ] ==========
[/code]
[/toggle_content]
Here we’ll have a look via step-by-step tutorial at how to: Create a New Marketo Form; Add a Bootstrap Modal Box; Add Marketo Guided Tags to Bootstrap Resource Code
Getting Started:
1. Create a New Marketo Form to use in your Landing Page & Modal:
Log into your Marketo instance and navigate to the Design Studio. In the right column (top) click “New” and in the dropdown menu, select “New Form” (see below). You’ll be prompted with a pop-up window to add a folder, name and description (optional) for your form. I’ve named my form: * Demo Form (the * makes it appear at the top of my list) but you can choose any name you’d like. Once you’ve named your Form and chosen a folder to house it, click “CREATE” to get started.

For now, you don’t need to do anything special with the form, so you can click “FINISH” then “APPROVE AND CLOSE” in the top right to skip thru the setup steps for now. We’ll come back to editing & styling a form later for now, we’ll just need something to test with.
2. Add a Bootstrap Modal Box to House a “Hide-Away” Marketo Form:
Find the template you created in the last tutorial and click the “Edit Draft” tab to open the HTML Editor for your template. If you’re just getting started, here’s some more info on the setup. We’re going to grab-and-add some default code for a modal then tailor that into our Marketo Page.
To begin:
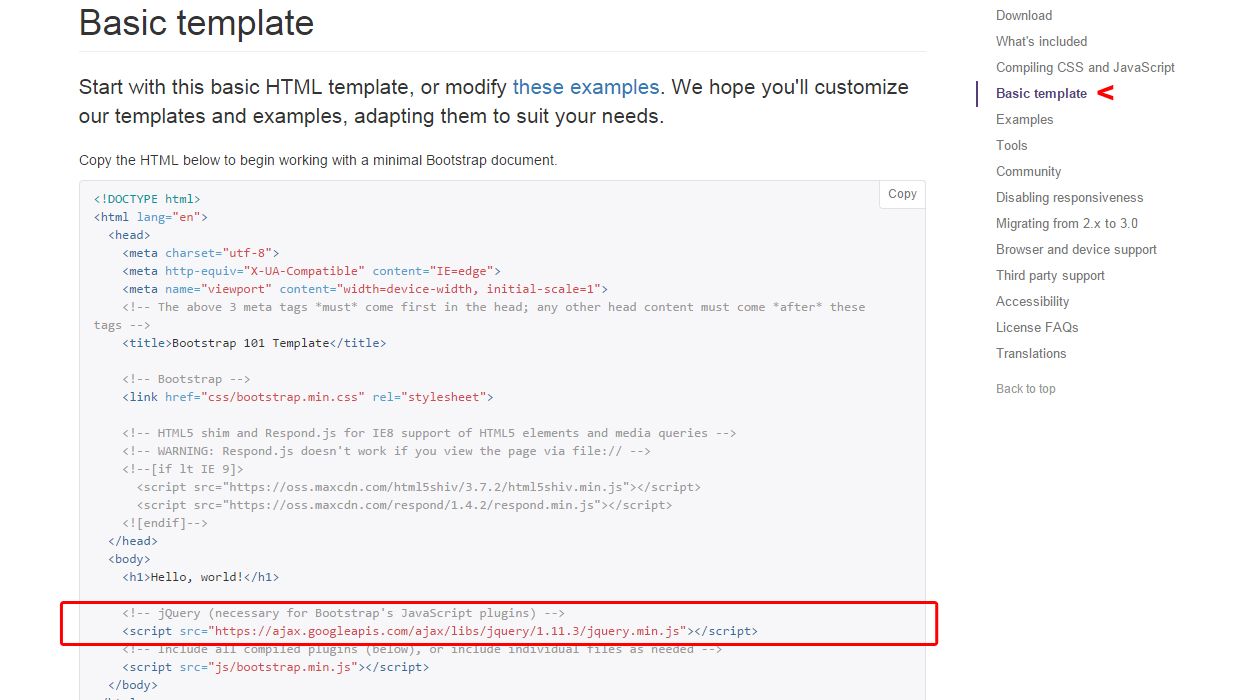
Open a new tab / window. We’ll start by adding some jQuery to our page (that’s right YOU are gonna use jQuery!) – but we’ll keep it simple as the good folks at Bootstrap have made this tremendously easy for us. You can find starter files, etc. for the Bootstrap framework and more, but for now, we’re looking for the jQuery script that’s going to make our Modal “work”.
Navigate to: http://getbootstrap.com/getting-started/#template – it’ll jump you to the Basic Template section which contains the jquery link we’ll want to be working with. Look toward the bottom of the code box and highlight > copy the first comment and script below the ‘Hello, world!’ line.
Next, go back to your Template Page Editor (code view) and in the copied code just after the last
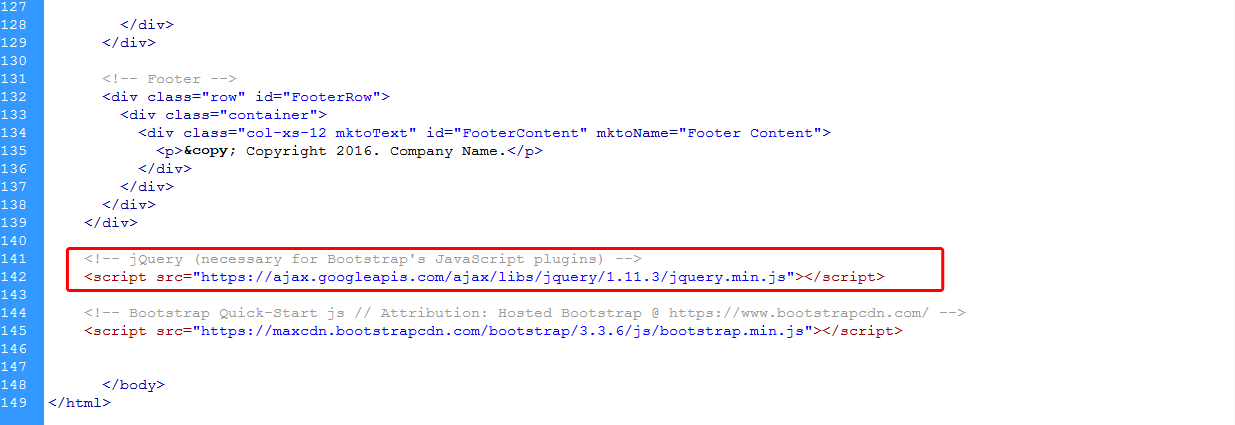
And just like that – you’ve added jQuery to your Landing Page. High Five! Now, we’ll add an HTML structure to leverage this new script on our page.
Open a new tab / window. We’ll be using some resource code which can be found at: http://getbootstrap.com/javascript/#live-demo. On the right side of the Live Demo EXAMPLE box (code section), click the “Copy” button to copy the HTML code for your modal.

Next, go back to your Template Page Editor (code view) and paste in the copied code just after the Right Column’s opening tag:
[toggle_content title=”View Code”]
[/toggle_content]
To get the styles to line-up with our template, we’ll add an “h1” class to the button (which gives it similar positioning properties as our headline in the left column and keeps them ‘even’). You could alternately add: style=”margin-top:20px;” inline to accomplish the same purpose.

Checkpoint!
Once you’ve got the button class updated, click “Preview Draft” in the top right corner (Marketo Template HTML-view) to see your progress. If everything went as-planned, your screen should look like this:

3. Add Marketo Guided Tags to Bootstrap Resource Code:
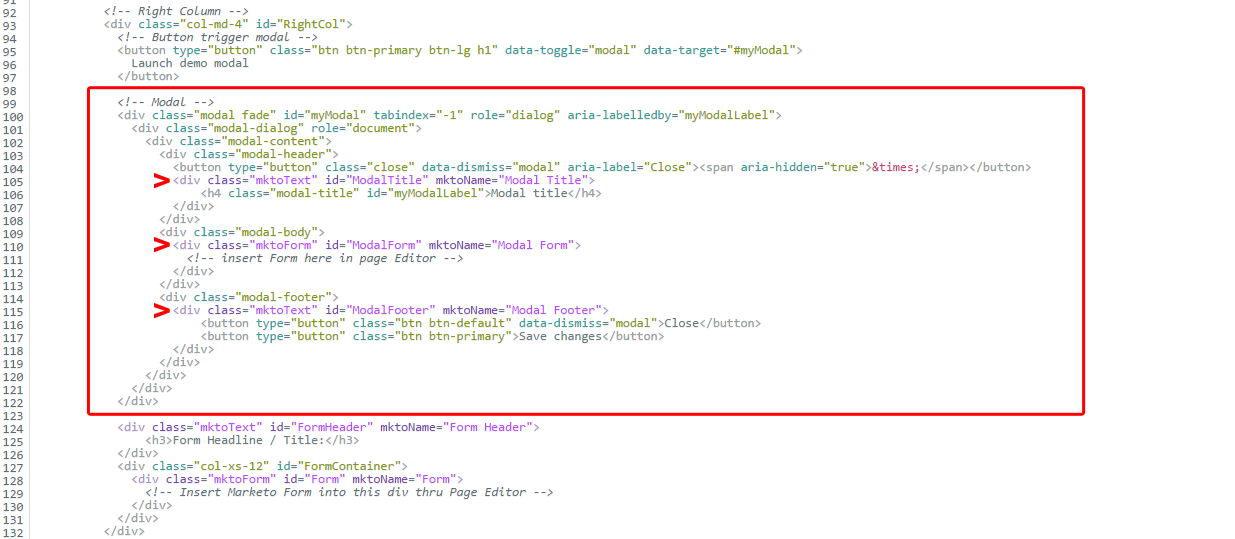
In order to get our new Modal elements to be editable in Marketo, we’ve got to add some Guided Tags to the code to let Marketo know where we’d like to add different elements. There are 3 main areas to address: The Modal Title; The Modal Body; The Modal Footer.
We’ll begin by wrapping the Modal Title in a
[toggle_content title=”View Code”]
Modal title
[/toggle_content]
** PRO TIP: The id= attribute cannot have spaces or special characters; The mktoName= attribute can have spaces and special characters. The ‘mktoName’ is the name that’ll show up in the Page Editor for your element, so be descriptive (i.e. not Heading 16).**
Next, we’ll add a form element to the body of the modal. You’ll want to replace the “…” with this code:
[toggle_content title=”View Code”]
[/toggle_content]
Finally, just in case we’ll want to edit the Close and Save Changes buttons in the footer of the modal, we’ll wrap those (just like the first) in a mktoText div – inside the “modal-footer” div:
[toggle_content title=”View Code”]
[/toggle_content]
In the end, your code should look like this:
Save your changes and approve the template. You can now create a new Landing Page using this template and add a Form into the Modal Form element in the Landing Page Editor. For more information on creating a Landing Page or adding your form, check out the Marketo documentation here: https://docs.marketo.com/display/public/DOCS/Create+a+Guided+Landing+Page